Wednesday 18 July 2012

Steam Tofu with Pork Mince in Soya Bean Sauce- A simple dinner dish

It's in mid July middle of winter and it's very cold in Melbourne. I just want an easy, warm and healthy dinner. Tofu is one of my favourite ingredient. It's soft, silky and nutritious. I love the softness of steam tofu with the flavourful stir fried port mince. It's simply delicious with a bowl of white rice in the cold night. 
 
This is the second time i cook this dish. I was telling myself that i have to drop down the ingredient and keep the recipe. It's really an easy and yummy dish for a midweek dinner. It's will be served on dinner table in less than half and hour. 


Steam Tofu with Pork Mince in Soya Bean Sauce

1 soft/silk tofu
250g pork mince

2 cloves of garlic ( finely chopped)
1 red chili ( finely chopped)
1 inch of ginger ( finely grated)
1 tbsp dried shrimp skin
spring onion for garnish
1 tbsp soya bean sauce

Pork Marinate:
1/2 tbsp soya sauce
1/4 tbsp sesame oil
1/4 tbsp cooking wine
1/4 tsp pepper


1. Marinate the pork mince.
2. Heat the oil and stir fry the garlic, ginger and red chili until fragrance. Then add the soya bean sauce.
3. Add in the marinated pork mince with the dried shrimp skin. Stir fry until nearly cooked.
4. Pour the pork mince on top of the tofu. Steam for 10 minutes
5. Garnish with spring onion, coriander or some freshly cut chili.
6.. Serve with white rice.

Monday 16 July 2012

Vietnamese Spring Roll Vermicelli


Vietnamese Spring Roll Vermicelli


1 package of vermicelli
Fresh vegetable: Mint, beansprouts, Cucumber, diced matchstick size, Lettuce, thinly chopped
Pickled carrots
Roasted peanuts, coarsely crushed
Scallion oil ( 2 tbs chop scallions, add about 2 tbs of hot olive oil and pinch of sugar and salt)
Dipping fish sauce (nuoc mam cham)

Vietnamese Spring Roll Vermicelli


  1. Place vermicelli in boiling water for about 6-8 min, stirring regularly so it won't stick to the bottom of the pot.
  2. Once done, drain and flush with cold water to stop cooking process.
  3. In large bowl, combine spring roll with lots fresh herbs, cucumbers, beansprouts, pickled carrots
    and, crushed roasted peanuts, scallion oil and dress with nuoc mam cham (dipping fish sauce).

Thursday 5 July 2012

Vietnamese Dipping Sauce (Nuoc Mam Cham)


Vietnamese Dipping Sauce is used as the sauce for the vermicelli. It can be used as dipping sauce for the spring role as well. It’s tasty and refreshing.
 
Vietnamese Dipping Sauce (Nuoc Mam Cham)
    1 ½ cup  water
    10 Tbsp fish sauce
    6 Tbsp fresh lime juice
    6 tsp rice vinegar
    6 Tbsp sugar
    1 deseeded and finely chopped fresh red chili
    4 cloves of finely chopped garlic
    ¼ cup finely sliced pickled carrots (optional)

Vietnamese Dipping Sauce (Nuoc Mam Cham)


1.       Combine water, rice vinegar and sugar in a saucepan, and gently bring this to a boil.
2.       Allow this mixture to cool down.
3.       Add the fish sauce, lime juice, chili, garlic and carrots into the mixture.
Vietnamese Dipping Sauce (Nuoc Mam Cham)


Note: If you have any leftovers, just put it into a container and freeze it for another meal.

*** The Vietnamese Vermicelli with Spring Roll Post is coming SOon..

Pickled Carrot


Vietnamese food is one of our favorite foods. It’s refreshing, tasty and healthy. Another than the traditional famous Pho (beef noodle soup), we like to have Vietnamese Vermicelli. Vietnamese vermicelli is a bowl of noodle filled with a lot of colourful fresh veges and herbs. It’s topped with peanut salt and mixed with the Vietnamese dipping sauce (Nuoc Mam Cham).

Pickled carrot is one of the topping for the vermicelli. I like the crunchiness of the pickled carrot. It’s easy to make and it can kept in the fridge for months. Here is the recipe of the pickled carrot.


Pickled Carrot

Carrot
Distilled white vinegar
Salt and sugar to taste

Add carrots along with just enough vinegar to submerge the vegetables in pickling container. Carefully season the pickling juice with roughly equal amounts of salt and sugar to taste. Pickle for at least 1 hr before use. It can be kept in the fridge for months.

Saturday 30 June 2012

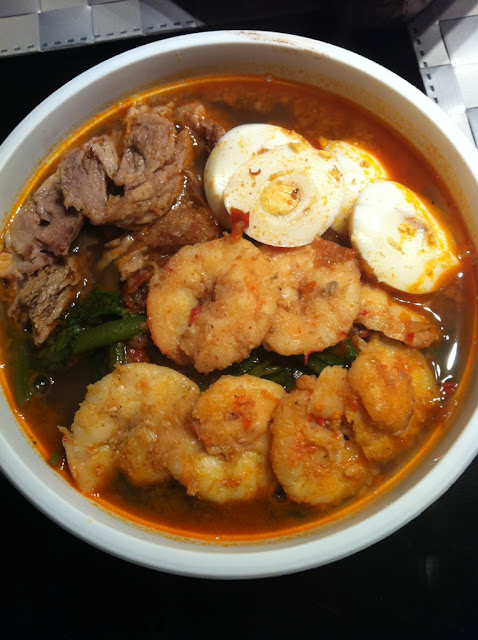
Penang Prawn Noodle - Hokkien Mee


Penang prawn noodle is a noodle soup franganced with chili spice paste and prawn broth. The combination of the chili paste and  prawn broth is just simply delicious. The broth takes a long time to cook, the longer it takes the better it tastes.

Back in my hometown, we can have a bowl of prawn noodle either as breakfast, lunch or dinner. It's available in most of the hawker food centre/ kopitiam. In Melbourne, we can get this in Malaysia crusine restaurant, however the taste is slightly milder. To taste a bowl of authentic penang prawn noodle, me and my sister either has to work hard to cook at home or fly back to penang :P

There are a few steps to make a bowl of noodle, but it's worth it when you can taste a bowl of authentic and flavoursome prawn noodle!

Penang Prawn Noodle- Hokkien Mee


Chilie paste:
30 red chillies
10 dried chillies
20 shallots
10 cloves garlic
4 tablespoons of water
12 tablespoons of cooking oil


Stock Ingredients

1.5kg of prawn , peeled, devinded and keep the prawn head and shell seperately
1kg of pork neck/shoulder

Toppings/Others
1 package of yellow noodles
1 package of rice vermicelli
Kangkung ( water spinach)
Some bean sprouts
Hard boiled eggs
Some friend shallot crisps ( store bought)


1. Blend the chili paste ingredients.
2. Heat up the wok and add cooking oil. Stir fry the chili paste for until fraganced. Dish up and set aside
3. On the same wok (unwashed), add in a little oil and cook the shrimp topping. Add in a little chili paste, sugar, and salt. Pan-fried the shrimp until they are slightly burned. Dish up, let cool and sliced them into halves.
4. On the same wok ( unwashed), add in a little oil and stir fry the prawn shell and head until cook, add in water, bring to boil and simmer on low heat for 2 hours.
5. Drain the foam out regularly.
6. After two hours ,add in half of the chili paste, then add in the pork neck/pork shoulder (whole peice) into the broth and cook for another 1-2 hour on low heat until the pork is cooked. Take the pork out, set aside until cool. Slice the pork into pieces and used it for topping.
7. Add some salt and sugar to taste.


To assemble:
1.  In boiling water, cook the yellow noodle/ vermicelli, bean sprout and kangkung then place in a bowl.
2.  Assmble the pork slices, egg, and prawn on top of the noodle
3. Ladle hot soup over
4. Last and not least, sprinkle some fried shallot and add chillie paste to your taste.


Thursday 28 June 2012

An Adult Birthday Cake


This is a birthday cake for my colleague. We were planning to give him a real ‘surprise’ on his birthday. We came out with the Adult theme birthday cake to make fun of him as he likes to call a pair of boob as soft cake. 

We were excited about the cake. It’s going to be a real surprise and we were pretty sure he’ll like it.
After the brainstorming of our ‘girl’ team, we come out with this design. The theme colour of the cake is hot pink. The bra design should have laces and polka dot. He (the figurine) definitely needs to put the hands on the pair of the boobs. 

Boob cake


This cake needs to have the ‘wow’ effect. The main feature of the cake is the boobs and the man’s figurine. It took me a while to find out what mold I’m going to use to shape the boobs. I walk in and out of my kitchen and I found a round container. It’s the perfect size and shape!  Ta dah!!! Here is the finished cake.
After I brought the cake to office, my colleague added a ‘mold’ on the top left hand side of the mouth and we also wrote our birthday wishes on the pad. 

Boob cake


Overall, we had great fun for this birthday celebration. The cake plays a main role in this party!

Tuesday 26 June 2012

Durian Mille Crepe

Durian Mille Crepe

Durian is in season now in tropical country. There are so many durian posts on Facebook from my Malaysia friends. I was drooling when looking at the photos on facebook. I’m a huge fan of durian; it’s just too ‘stinky’, yet delicious.

In Melbourne, there are some fresh durians available from the Asian market such as Footscary Market. I believe the durian was frozen during the transportation from Asia to Australia. The other option to get durian in Melbourne is the frozen durian from Asian Grocer. There are two types of Frozen Durian- Malaysian Durian and Thai Durian. A colleague of mine was showing me a photo of durian cake and everyone keep talking about durian. I want to make something with Durian to satisfy my craving!

 Mille Crepe has been in my to-do list for a long time. I decided to make DURIAN mille crepe. It sounds Yummy for durian lovers!


Durian Mille Crepe


Durian Mille Crepe

Mille Crepe is a very labour intensive cake as you need to make ‘thousand’ layers of crepe (in fact, 20 crepes are enough). It took me one and half hour to make the crepe.


Durian Mille Crepe
Here is the crepe recipe (Adapted from A Baked Creation).

Crepe Batter (Make 8’ Cake)
6 tablespoons butter
3 cups milk
6 eggs
1 1/2 cups flour
7 tablespoons sugar
A pinch of salt
The Crepe
  1. Make the crepe batter the night before.
  2. In a small pan, cook the butter until brown. Set it aside.
  3. In a small pot, heat the milk until it starts steaming and then set it aside to cool for 10 minutes.
  4. On medium-low speed with your mixer, beat together the eggs, flour, sugar, and salt. Slowly add the hot milk and browned butter to the mixture.
  5. Pour the batter into a container, cover and refrigerate overnight.
  6. The next day, bring the batter to room temperature. Place a nonstick 8-inch pan over medium heat. Swab the surface with the oil, then add about 2-3 tablespoons of batter and swirl to cover the surface. 
  7. Cook until the bottom just begins to brown, about 1 minute, then carefully lift an edge and flip the crêpe. Cook on the other side for no longer than 5-10 seconds. Carefully flip the crêpe onto a baking sheet lined with parchment. Repeat until you have 20 perfect crêpes


Durian Cream
900ml whipped cream
500g Frozen Durian (the more the better? I just love more intensive taste of durian)

Mashed Durian
  1. Whip the cream until it hold
  2. Smash the durian and fold into the cream.


Assembly the Mille Crepe 
To assemble, lay a crêpe on a plate. Pipe or use an icing spatula to completely cover the crêpe with a thin layer of the durian cream. Cover thedurian cream layer with a crêpe and repeat to make a stack of 20, with the best-looking crepe on top. Chill for at least 2 hours. Set it out for 30 minutes in room temperature before serving.


Friday 22 June 2012

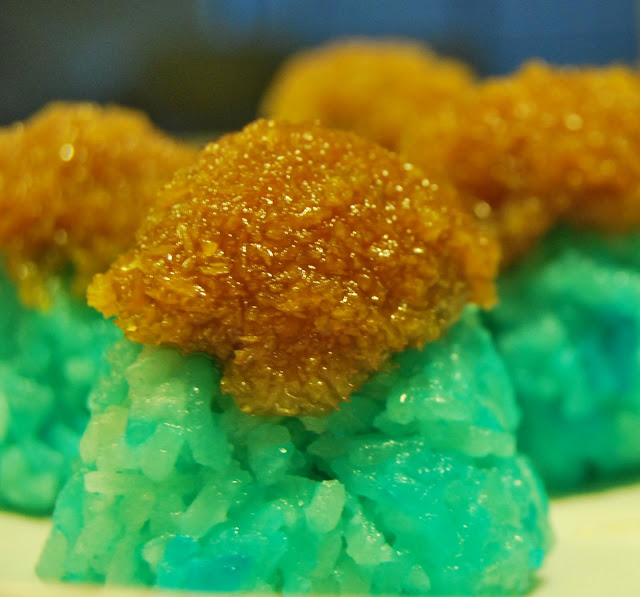
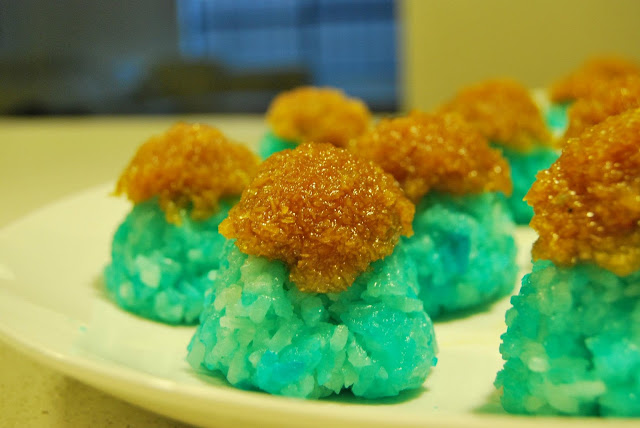
Pulut Inti - A Nyonya Delight

Nyonya Kuih is delicious. I did not appreciate it when i was back in my hometown as you can find them every where at anytime. Since after i came to Melbourne, i start missing the Nyonya Kuih. You can't really find a decent Nyonya Kuih 10 years ago in Melbourne ( when i first came). We are getting more nyonya kuih in Melbourne now. Yay!

Pulut Inti

Pulut Inti


Pulut Inti is made by glutinous rice. It's traditionally in blue colour using a natural blue colouring called blue pea flower. Blue Pea flower is native to tropical equatorial Asia. We cannot find it in Melbourne. Therefore i use a bit of blue colouring to replace it, just to get the feel of a real Pulut Inti.
Blue Pea Flower- Reference-Picture taken from:http://en.wikipedia.org/wiki/File:Clitoria_ternatea_%28Mussel-shell_climber%29_I_IMG_9809.jpg


Recipe was adapted from Rasa Malaysia website, with modified ingredients that could be obtained in Melbourne.

A few drops of blue colouring
300 g glutinous rice
230 g thick coconut milk
1/2 tsp salt
  1. Soak the glutinous rice in water overnight or about 6 hours.
  2. Add blue colouring.
  3. Steam glutinous rice in steamer for about 25 minutes or till rice is soft.
  4. Mix coconut milk and salt. Add into steamed glutinous rice and continue to steam for another 10 minutes.
  5. Remove and leave to cool.
  6. Serve with coconut filling.
Coconut Filling
150 g palm sugar ( preferably gula melaka from Malaysia)
3 tbsp sugar
1 pandan leave (knotted)
1 grated coconut (white part only)- I used dried dessicated coconut ( approxiamtely 1 cup)
80ml water
1tbsp cornflour mix with 1tbsp water
Method:
  1. Break the brown sugar/palm sugar into small pieces. Combine with the sugar, pandan leave and water. Cover over a medium flame until sugar dissolves.
  2. Add in grated coconut and stir till fragrant.
  3. Add cornflour mixture and stir for 2 minutes. Leave to cool.


Tuesday 19 June 2012

Passionfruit Mousse layer Cake


A delicate layered mousse cake combining curds, genoise sponge, and white chocolate decoration. The layer cake consists of different texture of sponge, mousse and curd. It’s not too sweet as the sourness of the passion fruit cut through the sweetness.
This cake takes slightly longer to make as it has three different elements- curd, mousse and sponge. The mousse is best to chill overnight before pouring the passionfruit glaze onto it.
I made this cake at Homesglen Tafe and re-produce it with a different decoration technique later on.
The recipe below is adapted from the Homesglen Tafe class. 
Passionfruit mousse cake


Make a 10 inches round cake
Genoise sponge: 
Eggs                              250gm
Sugar                            120gm
Plain flour                      100gm
Cornflour                       50gm
Melted butter (40C)       50gm

  1.  Set oven temperature to 180°C, grease and line cake tins and weigh all the ingredients.
  2. Place whole eggs and castor sugar in a mixing bowl and turn speed to medium- high. The volume of the eggs will increase and the mix will become pale and frothy. Continue mixing. Once the volume has tripled, reduce the speed to low. Mix for a further 2-3 minutes.
  3. Stop the mixer and remove the bowl. Sieve over half the flour. Using a rubber spatula fold through the flour mixing around the side of the bowl and up from the bottom. Add the remaining sieved combined flour and continue mixing only until no flour particles are evident; any further mixing knocks air out of the batter.
  4. Bake at 175°C for 35 minutes or for the smaller cakes 180°C for 20 minutes.

Passionfruit Curd :
Passionfruit pulp (strained)                         150ml
Castro sugar (1)                                         80gm
Unsalted butter                                          120gm
Eggs                                                          200gm
Castor sugar                                              80gm

  1. Bring the passionfruit juice, sugar (1) and unsalted butter to boiling point.
  2. Lightly whisk together the eggs and sugar (2).
  3. Gradually add the boiled juice to the egg mixture, whisking continually, then return the whole mix to the saucepan.
  4. Stir constantly over a low heat until the mixture returns to the boil. Transfer to a clean, dry bowl. Cover with plastic film and refrigerate.
Passionfruit mousse:
Gelatine leaf                                               8gm
Passionfruit pulp (strained)                         150ml
Caster sugar       (1)                                   60gm
Thickened cream                                       225 ml
Egg yolks                                                  80gm
Cater sugar         (2)                                  45gm
Semi - whipped cream                               450ml

1.       Soak gelatin in cold water.
2.       Bring passion fruit pulp, 60g sugar (1) and 225ml cream to boiling point.
3.       Combine egg yolks and remaining sugar (2), mixing lightly to combine.
4.       Slowly pour the boiled ingredients onto the yolks while stirring. Transfer the mix back in to the saucepan and cook over a low heat until the anglaise thickens (82-85°c). Do not boil.
5.       Transfer to a clean, dry, large bowl and add drained gelatin; stir until dissolved. Set aside to cool.
6.       When the passion fruit base is cool, fold in the cream. Do not allow the mousse to set. At this stage the gâteau must be assembled.

Passionfruit Glaze :
Passionfruit pulp strained                            250gm
Water                                                        150gm
Sugar                                                         125gm
Gelatin                                                       10gm

  1.   Boil the water, sugar and passion fruit pulp.
  2. Drain and squeeze the gelatin; add to the hot base and stir to dissolve.
  3. Allow to cool slightly before pouring on the mousse.
To assemble the cake


  1. Line the inside of the cake ring with plastic Acetate strip (5mm high).
  2. Place the round vanilla sponge in the bottom and soak with sugar.
  3. Spread a layer of passionfruit curd.
  4. Pour in the mousse and spread evenly.
  5. Allow the mousse to set in the fridge for 4 hours or overnight prior to service.
  6. Top it with the passionfruit jelly, allow the jelly to set.

Thursday 14 June 2012

Stuffed Pork Mince with Bitter Melon in Black Bean Flavour- Family Meal- 蒸苦瓜釀肉

Bitter melon is normally grown in tropical climates. Bitter melon in Australia are grown in Northern and Northern Western Australia. Surprisingly, the bitter melon in this winter looks really good. Sis bought a few bitter melon from Footscray market. The left over bitter melon has been sitting in the fridge for more than one week. I thought i had better cook it before it goes mouldy. We always have the bitter melon stir fried with egg, this time i want to try something different.
Stuffed Pork Mince with Bitter Melon
Before Steaming
Stuffed Pork Mince with Bitter Melon
After steaming

Stuffed Pork Marinade

200g Pork Mince
1 tbsp Black Bean
3 clove Garlic- finely chopped
1 Red Chili - finely chopped
1/2 tsp Soy Sauce
1/2 tsp Oyster Sauce
1/4 tsp Sesame Oil
Pinch of Pepper

1. Marianade the Pork for at least 30 minutes
2. Clean and scope out the middle part of the bitter melon.
3. Stuff the pork into the middle of  bitter melon
4. Steam the bitter melon for 10-20 minute minutes at high heat or until the bitter melon in soft and cooked
5. Take the steamed winter melon out, get the juice that comes out from the steaming. Pour into the sauce pan, add the combination of 1 tbsp of oyster sauce, 1 tbsp of cornstarch, 2 tbsp of water. Cook until the sauce thicken up and pour onto the winter melon.


Almond Biscotti

We used to buy Almond Biscotti from a friend's mum. It's very yummy and additive. You cant stop having it after the first bite. It's just crunchy and full of almond taste
Almond Biscotti


I had plenty of egg white left over from making the custard. I flipped through my recipe book, and found this recipe for Almond Biscotti. It's relatively easy and simple. There are only four ingredients. However, the drying process is a bit lengthy.

My first attempt- it's cut too thick.
The second loaf  is cut much more thinner.

Almond Biscotti- before the drying process

Recipe adapted from De Cordon Blue recipe collection

5 Egg Whites
185g Almonds Skin on
185g Castor Sugar
185g Plain Flour
Grated rinds of 3 Limes

1. Preheat the oven to 180C
2. Line the 1kg loaf pan
3. Whisk the egg white until soft peak then slowly add sugar and whisk until stiff
4. Add the shift flour, fold it into the egg white together with the lime rind and almonds
5. Bake for 45 minutes, then cool in the tin
6. Lower the temperature to 100C.
7. Remove the mixture from the tin. Use a very sharp knife to cut the mixture to a very thin slice.
8. Lay the biscuit on the baking tray ( only one layer), then dry in the oven at 100C for 35 min or until the biscuits are very dry and crisp.

Almond biscotti can serve with fruit, mousse, ice cream or just as a snack by itself. 


Sunday 10 June 2012

My Wedding Cake- Dec 2010

My cake decoration passion comes from the idea where i want to make my own wedding cake.
I went to a short cake decorating class and my passion of cake decorating grows from there.

This is the very first fondant cake that i make in the class. It covers all the basic techniques including layer the fondant, simple modelling and some ribbon work.


After the 4 weeks class, i had to make my wedding cake. I had no choice at that time except making the cake because i did not order any wedding cake for my wedding. Luckily, i manage to make the cake. I searched for the design i like, then started to look for the materials and ingredient.

Here is my wedding cake!! I love my wedding cake not because i made the cake myself but it matches all the decorations for my wedding.


Friday 1 June 2012

Carrot Cake with Cream Cheese Frosting- Classic

I've promised Carey to make her a birthday cake. She told me she likes carrot cake. I personally never really tried carrot cake, but i want to give it a try. It's a last minute job because i start making the cake the night before her birthday. Therefore, i decided to make cup cake instead of a cake.
Making cupcake requires shorter baking time and cooling time. It's perfect for the last minute job :p


The Carrot Cake


When i get home from work, i start to mould the Bunny & Carrot figurine. The figurine will take sometimes to harden up.

The bunny

After i have done the figurine, i start to bake the cake. Finally! haha.
While the cake in the oven, i work on the cream cheese frosting- Another classic yummy frosting.
I have managed to finish the cake by 10pm. Pretty effective and well organised night. :)

Here is the final product

The final product!


Carrot Cake- Make 12 cupcakes
175g  Brown Sugar
200g  Self Raising Flour
1tsp Bicarbonate of Soda
2 eggs
150ml Sunflower/Canola Oil
200g finely grated carrot
2tsp Cinnamon powder


1. Preheat oven to 180C and preparea 12 hole muffin tray layered with paper case
2. Mix together eggs, bicabornate of soda and sugar in a mixing bowl
3. Whisk together oil and egg in another mixing bowl, then sift in the flour, cinnamon powder along with the  grated carrot
4. Spoon the mixture into the muffin tray evenly and bake in the oven for 20min until golden brown.
5. Cool the cupcake in the tin for 5 minutes then place on wire rack to cool completely.


Cream Cheese Frosting

110g Unsalted Butter
300g Cream Cheese
100g Icing Sugar
1 tsp Vanilla Extract

1. Beat the butter until soft
2. Beat in the cream cheese until blended
3. Sift in the icing sugar and stir in the vanilla until smooth
4. Spoon into a piping bag and pipe a swirl on top of each cup cake


Simple Tuna Patties- Snacks/FingerFoods

I have some left over ready-made Puff Pastry in the fridge, so i decided to make some simple Tuna Patties for snack. it's verys simple yet very delicious and addictive. Maybe it's just because i like the Tuna Flavour:) It's also great for Party.


Before baking


Ready to serve-Yum!


1 can of 185g Tuna in Olive Oil/SpringWater
1/2 Onion -finely chopped
25g Butter
1/2 cup of grated parmeson cheese

2 ready-made Puff Pastry

1. Brown the onion, then add in Tuna.
2. Stir for 2-3 minute, then add the Butter and Cheese.
3. Stir untill well combine and remove from stove.
4. Let it cool down at room temperature before wrapping it in the Puff Pastry.
5. Egg wash the pastry before baking
6. Bake at 200C for 15 min


Saturday 26 May 2012

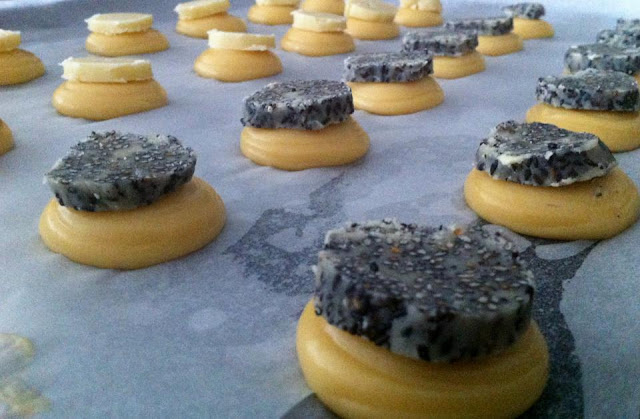
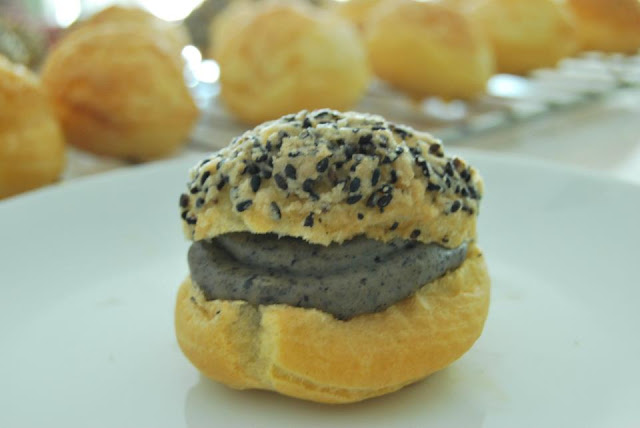
Black Sesame & Vanilla Cookies Top Choux Pastry

I have made choux pastry many times. Choux Pastry is good for sweet & savoury.
Cookies-Top choux pastry add the crunchiness and taste to the puff.

Black sesame is one of my favourite flavour. When i saw this recipe at Foodagraphy. By Chelle , I know I'm going to try this out.


Black Sesame Cookies Top Choux Pastry
Place cookies dough on top of the pipped choux pastry

Black Sesame Cookies Top Choux Pastry
Black Sesame Choux out of the oven
Black Sesame Cookies Top Choux Pastry
Plain choux out of the oven
Black Sesame Cookies Top Choux Pastry
filled with black sesame choux


Cookies Dough:
25g all purpose flour
25g unsalted butter
25g castor sugar
10g Black Sesame ( Roasted)

1.Place the unsalted butter in a bowl and use a spoon to mash till slightly softened.
2, Add in the sugar and mix to combine.
3. Add the flour (and cocoa powder if using) and use a spatula to mix till combined.
4. Wrap with cling wrap and roll into a mini cylinder. Place in the freezer to chill for at least half an hour

Choux Pastry:
60g all purpose flour
40g unsalted butter
100ml water
pinch of salt
2 eggs (100g)
Pinch of baking powder


1. Preheat oven to 200°C.
2. Place water, butter, salt in saucepan.Heat the mixture till the butter melts and boils (at least 95°C).
3. Add the flour and baking powder into the saucepan.stir the mixture quickly to mix.
4. Remove the mixture from heat. Continue stirring until the dough slightly coo; down.
5. Add in the eggs one at a time. Using the spatula, stir the mixture quickly to mix in the egg.
6. Transfer the dough to a piping bag. Line a tray with baking paper and start piping swirls of the dough onto the tray. You should end up with approximately 10 puffs.
7. Remove the cookie dough from the freezer, slice into ten pieces and place on top of the piped puffs. Press down slightly and ensure that the cookie rounds are in the center of the puffs
8. Place in preheated oven and bake for 30 minutes. Cool before filling with desired fillings.

Black Sesame Custard:
250ml milk
60g sugar
4 egg yolks
zest from one orange (optional)
12g corn flour
12g cornflour
8g butter
1/2 tsp vanilla paste
3 tbsp black sesame powder

1. Combine the milk, black sesame powder and vanilla in a saucepan, heat till just boiling.
In the meantime, beat the yolks and sugar till thick and pale yellow. Add in the flours and stir to combine.
2. Slowly add the heated milk to the yolks mixture. Whisk in a few tablespoons of the milk mixture into the yolks bit by bit, before adding the rest of the milk, whisking constantly.
3, Transfer mixture back to stove, cook over low heat, stirring constantly to prevent mixture from burning.
4, When the mixture has thickened (can coat the back of a spoon), remove from heat, stir in butter. Leave to cool completely. Refrigerate till ready to use.

Assemble:
You can fill the custard from the bottom of the pastry using pipping bag. Use a small knife, poke a hole at the bottom of the pastry and fill the custard with pipping bag

or

Cut the pastry into half, open it up and fill the custard in the middle using pipping bag.

Opera Gateau- 歌劇院蛋糕

Opera Gateau, one of my favourite layer cake. It consists of  Jaconde biscuit, Chocolate Ganache and coffee butter cream. The old classic flavour combination.

I love this cake because of the texture of the layers. The individual component is not hard to make. It's all about the assembling the cake to have each layer evenly.

Opera Gateua


Jaconde biscuit:
Blanched almond meal 135g
Icing sugar 135g
Eggs 270g
Plain flour 45g
Egg whites 135g
Sugar 22.5g
Melted butter 22.5g

1. Mix the almonds, icing sugar, eggs and plain flour together on the mixer until light and fluffy.
2. Whip the egg whites and castor sugar together until firm peak – but not over whipped.
3. Fold the 2 mixes together until smooth, then fold in the melted butter.
4. Spread evenly over baking tray and spread to a level consistency.
5. Bake in the oven at 220C until firm but not coloured.
6. Remove from the tray immediately once removed from the oven and sprinkle with sugar.


Coffee buttercream:
Water 75g
Sugar  No.1  205g
Egg whites  112.5g
Sugar  No.2 11g
Butter   ( softened )  230g

1. In a sauce pan, prepare sugar no.1 and the water and bring to the boils. Brush down the sides to remove any sugar syrup.
2. When the boiling sugar reaches 116C begin to whip the egg whites with the second sugar in the mixing bowl with the whisk attachment.
3. When the boiling sugar reaches 121C slowly pour the sugar down the side of the mixing bowl. Whip until room temp. Slowly add the butter to the mix, being careful not to curdle the mixture.
4. Mix until the mixture becomes light and fluffy. Store at room temp until time to use.


Chocolate ganache:
Fresh double cream 250g
Dark chocolate couverture 250g

1. Bring the cream to the boil and pour over the chocolate.
2. Form an emulsion, and cover to the surface until ready to use.
3. For use, ganache must be soft enough to spread, yet not too soft.


Coffee sugar soak:
Espresso coffee 100ml
Sugar 25g
Coffee extract 3g

1. Dissolve the sugar in the hot coffee and then add the coffee extract.
2. Store at room temp until time of use.


Opera Glaze:
Dark chocolate couverture 225g
Canola oil 25g

1. Melt the chocolate and stir in the oil. Store at room temp until ready to use. Use at 37C.

Assembling the gateau:
1. Spread a thin layer of coating chocolate over a sheet of the jaconde biscuit. Once set, flip this over onto a   sheet of silicon paper onto a lined tray.
2. Soak the biscuit through with the coffee soaker.
3. Apply butter cream over the sponge, making sure to build up the sides of the cake.
4. Set the next biscuit layer over the butter cream, and soak well with the coffee soaker.
5. Apply the ganache evenly over the second layer of the cake.
6. Place the last layer of butter cream on top of the cake, being  careful to make the top smooth and even.
7. Freeze the cake slab.
8. Pour the cake with the chocolate glaze, trim the sides. 

Tip: Dips the knife into hot water before cutting the cake to get clean edge.